

If there’s one thing most everyone knows about building a successful business, you need to create a sales funnel. Simply put, you won’t get rich selling just one product. Instead, you need to:
- Bring people into your funnel with an enticing lead magnet.
- Get them to hit the order button with a “no brainer” tripwire.
- Turn them into repeat buyers with your core offer.
- Increase the transaction amount with an upsell.
- And then sell something else to them on the backend.
Let us create your funnel now.
First…
Make a Plan
Here’s what you need to create your sales funnel:
- Lead magnet.
- Tripwire.
- Core product.
- Upsell for the core product.
- Backend product.
- Bonus products for these offers.
- Sales letters for these products.
- Autoresponder sequences for these products.
A little planning upfront saves you a lot of time down the road, so don’t skip this step. Once you’ve made your plan, then you can jump into the sales funnel creation. That’s next…
The 7-Step Plan For Creating A Buyer’s Guide as Lead Magnet For Your Sales Funnel

A buyer’s guide is a great lead magnet or freemium to offer to your prospects and customers. That’s because it saves people in your niche a lot of time. They don’t need to research every tool from scratch – all they have to do is look at your buyer’s guide to uncover the best tools available quickly.
And here’s something else…
Creating a buyer’s guide is really beneficial for you too. That’s because it’s an excellent way for you to generate sales effortlessly. Just distribute your buyer’s guide for free, and then watch sales come in on the backend.
So how do you create something like this? Simple – by following this seven-step plan. Take a look…
Step 1. Decide What You’re Going to Sell in your Sales Funnel
The first thing you need to do is decide what primary product you’d like to sell (and feature) in your guide. For example, do you have a tool you’d like to include? Do you have a resource you’d like to feature where people can get more information?
Now, you may have a few products in mind that you’d like to promote. For now, however, just focus on one primary tool. That way, you can design a guide around that main tool, resource, or other product you’d like to promote.
This brings us to the next point…
Step 2. Brainstorm What Kind of Buyer’s Guide to Create for your sales Funnel
Now that you know the main product you’d like to feature, your next step is to figure out what kind of buyer’s guide to creating. Again, you have three general options:
- Create a buyer’s guide focusing on just one set of tools or resources. For example, let’s say you wanted to create a buyer’s guide for marathon runners. And let’s suppose you wanted to promote a pair of shoes. In this example, you might create a shoe-buying guide. There would be no other gear listed (no compression socks, no water bottles, no moisture-wicking shirts) – just shoes.
- Create a buyer’s guide focusing on the tools needed to complete one step or task in a process, or otherwise focusing on one area. In this example, let’s suppose you were creating a buyer’s guide for online marketers. You might take just one step – such as setting up a blog – and present the tools for that step. Areas covered in this guide might include choosing a blog platform, choosing a theme, and choosing plugins.
- Create a buyer’s guide to cover an entire process. Let’s say you were creating a buyer’s guide for online marketers. Here you’d offer various tools, such as payment processors, autoresponders, content management systems, advertising venues, outsourcing resources, and more.
For our purposes (the goal being to sell a specific product), I’d suggest you go with the second option – and that’s what we’ll talk about here in this guide. That way, you can focus on promoting your primary tool. Let me give you a few more examples of this type of buyer’s guide…
- A buyer’s guide for marketers who are setting up a mailing list.
- A buyer’s guide for competitive bodybuilders who need the right oils and hair removal products to accent their muscles for competitions.
- A buyer’s guide for RVers shows them how to get connected while on the go, including TV and internet service.
- A buyer’s guide for gardeners full of products for getting rid of pests.
- A buyer’s guide for computer owners shows them how to secure their computers (firewalls, anti-virus software, etc).
You get the idea. Next step…
Step 3. Research Tools To Include In Your Buyer’s Guide
You already have at least one tool in mind that you want to promote. Now you need to research other tools in your guide.
If you’re very familiar with your niche, you may already know what tools to include. If not, then you’ll need to do some research. Here are a few ideas…
- Survey prospects and customers in your niche to learn more about what tools and resources they use.
- Survey your colleagues to find out what tools they use.
- Search Google for task-specific tools. (E.G., “List of autoresponders” or “best harnesses for mountain climbers.”)
The second thing you need to do is research each tool to ensure it’s a solid product with a good reputation. Then, ideally, you should use the tool or resource for yourself – i.e., take it for a thorough test drive.
Next…
Step 4. Organize The Guide
Now that you have your list of tools that you’d like to promote, it’s time to set about the task of organizing the guide. Your top goal at this step is to make sure that the primary tool you’re promoting is featured in a prominent place within the guide.
Hint: when you’re organizing your guide, keep the recency and primacy effect in mind. This effect says that the first and last items on a list tend to be remembered better and/or deemed as more important to readers. So that means your featured tool should appear right at the top of your guide and perhaps at the end too.
Indeed, you may want to start your guide with a “Featured Tool” page that talks exclusively about the tool you’re promoting. Then you can mention it again within the guide itself, where appropriate.
What you’ll want to do is organize your guide logically. For example, if you’re writing about how to set up a blog, then you’ll present the tools in the order that the person would need to use them. For example:
- CMS platforms
- Themes
- Plugins
Here’s another example. Let’s suppose you’re offering a buyer’s guide for runners. Your guide might be ordered:
- Socks first…
- Then shoes (so people can see how the shoes fit with the chosen socks).
- Shorts.
- T-shirts.
- Reflective vests.
In other words, think of the step-by-step process your prospect needs to go through to complete a task, and then present the tools in chronological order. Where appropriate, create categories (e.g., “shoes, “socks,” etc.) for quick referencing.
Next…
Step 5. Create The Guide
Now that you’ve chosen the order and created categories, it’s time to create the guide. You’ll want to tell your buyer what to look for and what to avoid in a particular product or service for each category.
Let’s suppose your guide covers email service providers/autoresponders. You’d start out this section of your guide talking about major features such as:
- How many autoresponders you can set up within an account.
- How many subscribers you can have per account.
- Whether the autoresponder has a tagging feature.
- Whether the autoresponder employs automation rules.
- Whether you can segment a list easily.
- Whether the autoresponder has built-in tracking tools.
You’d then tell your reader what to look for (and why) when they’re shopping for each feature. For example, you’d let readers know they absolutely want an autoresponder with built-in tracking tools, as that makes it easier to improve the conversion rates on email campaigns.
Next, you’d then list the tools in each of your categories and write a paragraph or two about how each tool measures up in terms of the most important features you listed earlier in the guide.
TIP: You might consider sharing this information in a graphic as well as within the text. For example, make a simple table with a list of features across the top and a list of service providers down the side. Then put an “x” or a checkmark in each box to show whether a particular service has a particular feature.
Finally, be sure to tell readers which tool is best for which type of people.
For example: “Aweber is a great tool for small business owners because [insert reasons].” Or “GetResponse is a great choice if you’re an author or blogger, because [insert reasons].”
In summary, here’s what your guide looks like:
- An introduction to the major features of a category of products or services.
- What buyers should look for with regards to these features.
- A list of products or services, along with notes about whether they have the major features.
- A note alongside each product or service to let buyers know what type of person would benefit the most from the product or service.
And then, of course, you need to provide a link and call to action next to each tool (e.g., “Click here to see if Aweber is right for you…”).
Now, remember, there is one primary tool that you’re promoting. Therefore, you should provide:
- Plenty of benefits.
- A strong recommendation for that tool.
- A specific call to action.
In other words, make it clear that the tool you’re primarily promoting is the one you give the highest recommendation to – and be sure to tell readers why it’s the best tool on the market.
TIP: Even though you’re primarily promoting one tool, be sure to include affiliate links to the other tools in the guide. It’s best if you use a redirect link that goes through your domain and then redirects to your affiliate link. That way, if you ever change your mind about a tool or if it goes off the market, you can change the link on your end to something else. That prevents you from having thousands of guides floating around with a link to a product that you no longer recommend or one that’s no longer available.
Next…
Step 6. Double Check Everything
This step is easy – go through your complete guide and do two things:
- Proof it. Check for spelling errors, grammatical errors, factual errors, and other problems.
- Check links. Be sure to click on every single link to be sure it’s working correctly.
And then…
Step 7. Convert and Rebrand It For Your Partners
Your final step is to convert it into an easily downloadable format such as a .pdf. Your computer may already have these conversion tools available. If not, you can use any free tools or professional tools such as those available at Acrobat.com.
The second thing you’ll want to consider is creating re-brandable versions for your marketing partners. In other words, let them put their affiliate links into your guide. Then, if anyone buys one of your tools, then both you and your marketing partner make money.
TIP: You can create these rebranded versions manually for select marketing partners. Alternatively, search Google for “pdf rebranding” to uncover still more options.
Simple, right?
You just discovered a simple seven-step plan for creating your own buyer’s guide that helps you build your list and make sales on the backend. Now that you have a plan, it’s time to put it to work for you. Because the sooner you do, the sooner you can start enjoying rewards!
Here are a few tips to keep in mind when you create other lead magnets in the future:
- Your lead magnet should be a high-quality piece of content. Sometimes people use the lowest-quality content for this step as they’re giving the item away. However, your goal is to impress your prospects. That’s why you need to offer them a high-quality, functional product – something you could easily sell. For example, I am giving away the free book about Sales Funnels. People will get everything they need to create the sales funnel when they read it. It is useful, and it will help them in their sales process.
The lead magnet should naturally lead to the tripwire product. Think of the lead magnet as being useful yet incomplete. Anyone who reads the lead magnet will naturally want the tripwire as well, as the tripwire should be a natural extension of the lead magnet.
- For example, maybe your lead magnet provides an overview of a process, such as how to set up a blog. In that case, then the tripwire might provide the exact, in-depth instructions with screenshots.
The lead magnet should include a strong call to action at the end. This is where you tell people exactly what they need to do next.
- For example: “Setting up a blog seems easy enough – but if you do it wrong, you open yourself to hackers who’ll destroy everything you’ve built. Don’t let this happen to you. Click here to find out how to protect your blog and your financial future…”
Here are Product-Naming Templates you can use for your lead magnet
Fair or not, your prospects are going to make their buying decision in large part based on the name of your product. That’s why you want to make sure you brainstorm and test a lot of different titles so that you can find the one that attracts the most cash-paying customers. And a good place to start your brainstorming is with these product-naming templates. Take a look…
1. The Quick and Easy Way to [Get a Benefit]. E.G., The Quick and Easy Way to Land Your Dream Job.
2. What [Some Pros] Know About [Getting Some Benefit]. E.G., What Million-Dollar Copywriters Know About Crafting High-Converting Sales Letters.
3. How to [Get a Benefit] [In Some Short Amount of Time]. E.G., How to Housetrain Your Puppy In 72 Hours or Less.
4. The Surprising Way to [Get a Benefit]. E.G., The Surprising Way to Save Thousands on Your Energy Bill.
5. [Some Process] Made Easy. E.G., Car Buying Made Easy.
6. [Accomplish Some Goal] In [Some Short Time Frame]. E.G., Start a Six-Figure Business in Just One Hour Per Day.
7. How to [Get a Benefit], Even [If You Have Something That Might Prevent You from Getting Good Results]. E.G., How to Lose 50 Pounds Quickly and Safely, Even If Your Metabolism Is Super Slow.
8. What [Some Person] [Won’t Tell You or Doesn’t Want You to Know About Some Topic]. E.G., What Your Personal Trainer Won’t Tell You About Losing Weight.
9. [Some Topic] Magic. E.G., Marketing Magic.
10. How to [Get Some Benefit] Without [Investing a Lot of Time or Money]. E.G., How to Start a Six-Figure Business Without Investing a Dime of Your Own Money.
11. What [Type of Person Does] When [They Need to Get a Benefit]. E.G., What Personal Trainers Do When They Need to Lose a Quick 10 Pounds.
12. The [Old] [Type Of] Secret That [Gets Some Results Like Crazy]. E.G, the 2000-Year-Old Nutrition Secret That Melts Fat Like Crazy.
13. The Simple Way to [Get Some Result/Do Some Task]. E.G., The Simple Way to Train for Your First Ultra Marathon.
14. [Number] [Tips/Tricks/Secrets/Hacks] For [Getting Some Result/Doing Some Task]. E.G., 101 Productivity Hacks for Getting a Lot More Done in a Lot less time.
15. How to [Get a Benefit] In [Number of Easy Steps]. How to Start a Profitable Blog in Five Incredibly Easy Steps.
Once you’ve worked through the above templates, you’ll probably even have more possible titles come to mind. Be sure to write them all down so you don’t forget them, and then get to work uncovering the title that puts the most money in your pocket!
Create the lead magnet page using your guide
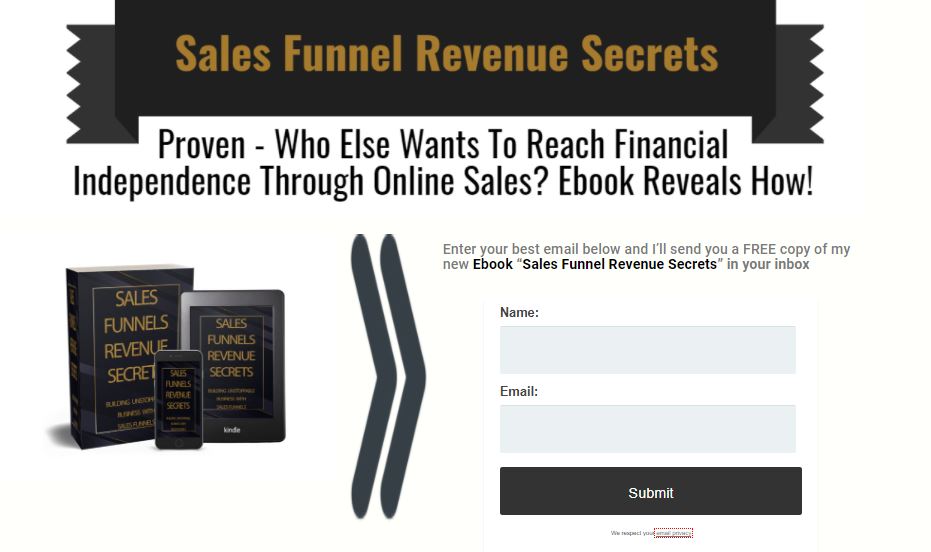
Now you need to decide how you’re going to use the guide.
The first thing you need is the free product you’re going to use to bring people into your sales funnel. This is the product that your prospects will get in exchange for a lead magnet and, in our case, is your guide. We created the guide you can offer as a lead magnet
Here’s what you need to do:
It would be best to have a funnel builder software or plugin to create this page and connect it with your autoresponder. There is a lot of funnel builders software on the market.
I use web plugins: thrive architect and elementor plugins to build my landing pages and sales pages. Also, I use funnelvio from time to time.
On this page, you need to put your lead magnet and insert your opt-in form. Be sure to include your autoresponder opt-in form at the end of the page too or put the button to redirect to it.
here are some examples
TIP: If you are not familiar with creating funnels, then you might consider hiring a professional for this step. You can find a copywriter by posting a project on freelancing sites
Next…
Put Together Your Tripwire Product
Now it’s time to create the next piece of your sales funnel. This is a high-quality, desirable product that comes at a low price (such as $7). You want this to offer a lot of value at a low cost so that it’s basically a “no brainer” purchase. This will turn your prospects into customers more quickly.
Here are tips for creating your tripwire:
- Create something unique.
- Plant seeds that lead to the core offer. Your sales funnel is a progression. That means your tripwire product should naturally lead to your core offer.
For example, suppose your tripwire product shows people how to set up a successful Facebook ad campaign. In that case, the tripwire product may go deep into this topic to discuss conversion testing, it may offer ad templates, it may show tons of examples, etc.
As you create your tripwire, plant seeds early in the product that will give you an opening to introduce your core product at the end.
Example: “In just a few moments, you’ll find out which resource can double your conversion rate. But first…”
- Add a call to action at the end. This is where you pitch the core offer.
E.G., “Imagine making money with every ad campaign you create. You can, once you know these ad secrets! Click here to discover them for yourself…”
Next…
Create a Bonus for The Tripwire

You can boost your conversion rates by adding a bonus to the tripwire product. Again, this is something that’s highly related to the product and/or compliments it.
For example, if the tripwire product is an in-depth report on setting up a Facebook ad campaign, then your bonus offer might be a package of ad templates.
TIP: Be sure to include a call to action in your bonus that leads to the core offer.
Next…
Set Up Your Tripwire Sales Letter
Same here as with the lead page –this is easy to create if you know what you need to include in it
Remember to do the following:
- Create and insert your payment button at the end.
TIP: Remember, this is a low-priced product, somewhere in the $7 range, so price accordingly.
- Insert your name into the sales letter. This mainly refers to the sign-off/signature at the end but may include anywhere else you might reference yourself in the letter.
- Be sure to create to fit your content. Again, if you compiled multiple pieces, your letter’s benefits need to reflect your tripwire product.
Next…
Put Your Core Offer of Your Sales Funnel
So far, your lead magnet leads to your tripwire, and now your tripwire should lead to your core offer. This is your flagship product in this sales funnel. Generally, you can figure on pricing it anywhere from $50 to $100 or even more.
You should also include a call to action and link for our backend offer.
You want to be sure this is a high-quality offer so that your customers will feel like they’re getting good value. Here are ways to make increased the perceived value of the product:
- Position it as a premium product. Simply put, if you market this as a unique and premium product and put a higher price tag on it to match, then your prospects and customers will view it as a high-quality product.
Need proof? Just look at wine sales. Many people shop based on price, and in blind taste tests, they’ll say the most expensive wine tastes better – even if that wine is actually a cheap bottle. People judge quality based on price!
- Offer it as an e-course. Instead of offering an ebook, offer a course. This naturally carries a higher perceived value.
- Provide advanced instruction. That’s because advanced instruction almost always carries a higher perceived value than beginning-level content.
Next…
Create Bonus #1
Now you need to create a bonus that compliments your core offer. Ideally, it should be another highly attractive piece of the solution.
For example, if your core offer shows people how to write a sales letter, then your bonus product might be a pack of headline templates and swipes.
Be sure to include a link and call to action for your backend offer within this bonus.
Create Bonus #2
The same thing as above – now you’re just creating a second bonus for your sales funnel. However, it too should be highly related to the core offer, and it should include a link and call to action for the backend product.
Craft Your Core Offer Sales Letter For Your Sales Funnel
Time to create a sales letter.
Steps to take:
- Engage the reader emotionally, perhaps by telling a story.
- Present the problem.
- Introduce the product as the solution, and share the benefits.
- Build credibility. Why should people listen to you?
- Provide proof of your claims.
- Describe both the bonus products. Again, focus on benefits.
- Insert your payment button alongside a strong call to action at the end.
- Be sure your name appears on the sales letter (not any generic placeholders).
- Insert your payment button and call to action.
Next…
Get Your Upsell Product Ready For Your Sales Funnel

Your order form should include an upsell product – this is something related and desirable that you offer on the order form to increase the transaction amount.
For example, if you’re selling a copywriting course, you might offer:
- Personal coaching and feedback.
- A report that focuses on how to write headlines.
- A copywriting toolkit, such as profiling worksheets, templates and more.
Next…
Add Your Upsell To The Order Form
When people click on your payment button, they’ll be taken to a page that offers them the upsell. Here’s where you’ll need to write the copy for the upsell.
TIP: Use a short form copy. Your prospects just got through reading a long sales letter. They’re already in the buying mood. So all you need to do is give them the benefits of the upsell product along with a call to action to add it to their order.
And then…
Set Up Your Backend Offer For Your Sales Funnel
This is the product that you’ll pitch to customers who purchase your core offer. As always, it’s part of a progression – the backend offer is just another part of the overall solution.
For example, if your core offer is a course on how to create information products, then the backend offer might be in-depth instructions on how to create video tutorials.
Up next…
Create a Bonus For Your Backend Offer
Just as you did with the core offer, create a desirable and highly related bonus offer.
Create a Sales Letter For the Backend Offer
Now edit a sales letter or create one from scratch. Either way, follow the same steps and instructions as outlined above regarding sharing benefits, emotionally engaging prospects, inserting a payment button and so on.
Create Autoresponder Sequence #1 For Your Sales Funnel
This will be a five to seven-part email sequence that you send to people who request your lead magnet product. EACH email in the sequence will be part content, part pitch to purchase the tripwire product.
For example, if the tripwire product is about writing great sales letter headlines, then you might create a five-email sequence called “The Five Secrets of Creating Cash-Pulling Headlines.” Each email would contain one secret (a tip) along with a pitch to purchase the tripwire.
And then…
Create Autoresponder Sequence #2 For Your Sales Funnel
This is a three to a five-part sequence that you send out to customers who purchased the tripwire. As with the above, each email is part content and part pitch. In this case, you’re selling the core offer.
For example, if the core offer is all about using social media marketing, then you might send out a three-part sequence called “The Three Social Media Platforms EVERY Marketer Ought To Be Using.”
Create Autoresponder Sequence #3 For Your Sales Funnel
The final sequence is a three to five-part series that you send to people who purchase the core offer. Again, it’s part content (which you can create by grabbing excerpts from the PLR content) and part pitch. In this case, you’re promoting the backend offer.
Proof and Polish Your Sales Funnel
Whew, you’ve created a lot of content. Now it’s time to go back through everything just to prove and polish it all. This shouldn’t take long.
Upload and Test Links
You’re almost done. Now you just need to do the following:
- Upload the products to your website.
- Create and upload delivery pages to your website. (These are the pages where your customers will go to download their purchases.)
- Upload the sales letters.
- Upload the emails to your autoresponder.
- Test everything to be sure links, payment buttons, and opt-in forms work.
And done!
Congratulations – you just found out how to create an entire sales funnel. If you get started now, you can be done in less than a week. So what are you waiting for? Put this strategy to work for you today!
And here are
Five Customer Service Mistakes You Don’t Want to Make
You got customers throughout your sales funnel. However, your customers don’t make decisions about your business based on the quality of your customer service alone. Instead, they most often decide whether they’ll continue to do business with you based on their experiences with you. That’s why people who receive a delicious meal but poor service at a restaurant don’t very often go back. And your customers are the same way – they might receive an awesome product, but they’re unlikely to do repeat business if the customer service stinks.
So how do you provide a good customer service experience? You start by avoiding these common mistakes…
Mistake 1: Putting a Low Priority on Customer Service
Sometimes business owners look at customer service as a nuisance, so they put it on a low priority. That’s a mistake. Without your customers, you have no business. That’s why you’ll want to be sure that everything from your web design to the ordering process to customer care experience is your top priority so that your visitors walk away satisfied.
Mistake 2: Taking Too Long to Answer Customer Inquiries
Shopping online is a fast-paced activity, and if you don’t answer customer service inquiries quickly, your prospect will move on to your competitor. That’s why you want to make sure you answer inquiries the same day, and even within an hour or two if possible.
Mistake 3: Not Providing Anything Other Than an Email Address
The problem with handling all customer service strictly through email is that emails can get lost – on your end or the customer’s end. And when they do get lost, the customer will assume you’re ignoring him or her. As you might suspect, that’s a problem.
The solution? Use a help desk platform instead. Even if you use email, the help desk platform keeps a record of the entire conversation so replies never get lost.
Mistake 4: Failing to Train Your CS Reps
Another common mistake is to assume that your hired staff knows everything there is to know about providing good customer care. That’s not necessarily true, even if they are experienced. That’s why you’ll want to layout instructions for all your staff about how to handle customer service inquiries, including:
- Offering cut and paste answers for common inquiries.
- Providing training on how to incorporate your business branding into customer service replies, where applicable.
- General instruction about what you expect, such as how to address customers and prospects.
Next…
Mistake 5: Not Anticipating High-Volume
Suppose you’re running a big sale, launching a product, investing more in advertising, or even enjoying the content that’s gone viral. In that case, you’re likely going to experience more volume than normal at your help desk. Make sure you anticipate these higher-volume days and proactively bring on more staff to handle the extra load.
It is your term now
Customers are the lifeblood of your business, so make sure you treat them right. Your first step? Create the sales funnel and avoid the five mistakes listed above! If you need extra help you can read the book I wrote about sales funnels, order the course – short or long version or book a free consulting call with me
